Andorid插件之资源去重丶图片压缩丶混淆插件(1)
APK 瘦身是很多公司忽略的问题,因为现在网速快速发展以及流量的降费,这个问题也越来越被忽略。但是大项目还是很在意瘦身的,支付宝对瘦身就做到了极致( 参考链接 )。
网上大部分的方案都是:
- 压缩图片
- 减少多余的so
- 删除无用资源
- 代码混淆
这些方案大部分都是在编写代码时期做的操作,容易出错和遗漏,我觉得这都算不上什么瘦身只能说是常识。于是我想能不能开发一款插件,在 APK 编译期间对 Apk 进行一系列的优化呢?
Android的Plugin插件
现在的 Android 集成开发工具 Android Studio 构建 APK 是通过 Gralde 脚本去构建, Gradle 完美兼容 Groovy Java Kotlin 语法。所以说 Android Studio 只是一个集成开发工具,没有这个工具我们也能 打包 运行 安装 APK 。
我们每个项目根路径都有一个 build.gradle 配置文件。开发 Android 根目录里面会配置一个 classpath 'com.android.tools.build:gradle:x.x.x' 的配置。这意思就是要 Android 的编译插件,这里面定义了所有的 Apk 打包,签名,安装等的一系列 Task 。
buildscript {
    ....
    dependencies {
        ....
        classpath 'com.android.tools.build:gradle:x.x.x'
    }
}
复制代码
classpath 'com.android.tools.build:gradle:x.x.x' 是基于 Gralde 开发的,所以他们是有一个对应版本对象关系的。
一般我们升级自己项目的 Gralde 也需要去升级下 Android 编译插件。 查看版本对应关系
最后我们会在项目的 build.gradle 配置使用插件, apply plugin: 'com.android.application' 或 apply plugin: 'com.android.library' ,也就是使用插件啦。
输出Apk编译的所有Task
根据上面的内容,我们知道了 APK 的打包流程,都是通过 apply plugin: 'com.android.application' 顺序执行 Task 完成的。我们来看看输出的有哪些 Task 吧。
在 App 项目中 build.gradle 编写以下代码。
project.afterEvaluate {
    def tasks = ['preDebugBuild',
                 'compileDebugAidl',
                 'compileDebugRenderscript',
                 'checkDebugManifest',
                 'generateDebugBuildConfig',
                 'prepareLintJar',
                 'generateDebugResValues',
                 'generateDebugResources',
                 'mergeDebugResources',
                 'createDebugCompatibleScreenManifests',
                 'processDebugManifest',
                 'splitsDiscoveryTaskDebug',
                 'processDebugResources',
                 'generateDebugSources',
                 'javaPreCompileDebug',
                 'compileDebugJavaWithJavac',
                 'compileDebugNdk',
                 'compileDebugSources',
                 'mergeDebugShaders',
                 'compileDebugShaders',
                 'generateDebugAssets',
                 'mergeDebugAssets',
                 'transformClassesWithDexBuilderForDebug',
                 'transformDexArchiveWithExternalLibsDexMergerForDebug',
                 'transformDexArchiveWithDexMergerForDebug',
                 'mergeDebugJniLibFolders',
                 'transformNativeLibsWithMergeJniLibsForDebug',
                 'processDebugJavaRes',
                 'transformResourcesWithMergeJavaResForDebug',
                 'validateSigningDebug',
                 'packageDebug',
                 'assembleDebug'
    ]
    for (String taskName : tasks) {
        printTaskInputsOutputs(taskName)
    }
}

def printTaskInputsOutputs(String taskName) {
    def realTask = project.tasks.findByName(taskName)

    if (realTask) {
        println 'find ' + taskName + ' task -----------------------'

        realTask.doLast {
            realTask.inputs.files.each { fileTemp ->
                println 'input file:' + fileTemp.absolutePath
            }

            println '---------------------------------------------------'
            realTask.outputs.files.each { fileTemp ->
                println 'output file:' + fileTemp.absolutePath
            }
        }
    }
}
复制代码
我查看了部分 Task 的输入输出,并不是所有哦,大家可以自行输出一个项目的所有 Task 或者官网 Task 依赖关系(相信我你会疯掉的)。
创建插件工程
大家用什么工具开发呢?我反正用的是 Android studio ,当然你也可以用 InteliJ IDEA 他俩兄弟都是可以通过 Gralde 构建项目的。
我用的是 Android studio ,因为是给 APP 用比较方便调试。
-
在工程目录中创建文件夹
buildSrc,一定要是buildSrc文件夹哦。因为这样命名的项目,无需将插件项目打包在本地也可以在任意子项目使用插件(相当方便哦)。 -
创建
buildSrc/build.gradle文件,编写以下内容,由于我用的是Kotlin编写,所以我依赖了Kotlin插件(也可以用Groovy语法哦)。
apply plugin: 'java'
apply plugin: 'kotlin'


sourceCompatibility = 1.8

buildscript {
    ext.kotlin_version = '1.3.50'
    repositories {
        jcenter()
        google()

    }
    dependencies {
        classpath "org.jetbrains.kotlin:kotlin-gradle-plugin:$kotlin_version"
    }
}

allprojects {
    repositories {
        jcenter()
        google()
    }
}

dependencies {
    implementation gradleApi()
    implementation localGroovy()
    implementation 'com.android.tools.build:gradle:3.3.0'
    implementation 'org.jetbrains.kotlinx:kotlinx-coroutines-core:1.3.2'
    implementation "pink.madis.apk.arsc:android-chunk-utils:0.0.7"
}

compileKotlin {
    kotlinOptions.jvmTarget = "1.8"
}
compileTestKotlin {
    kotlinOptions.jvmTarget = "1.8"
}
复制代码
- 创建插件入口
buildSrc/src/main/java/com/qihoo/koimg/KoImgPlugin.kt,插件的入口,所有的开始都是从个类出发。
class KoImgPlugin : Plugin<Project> {

    override fun apply(project: Project) {
        println("我要起飞来!!")
    }
}
复制代码
-
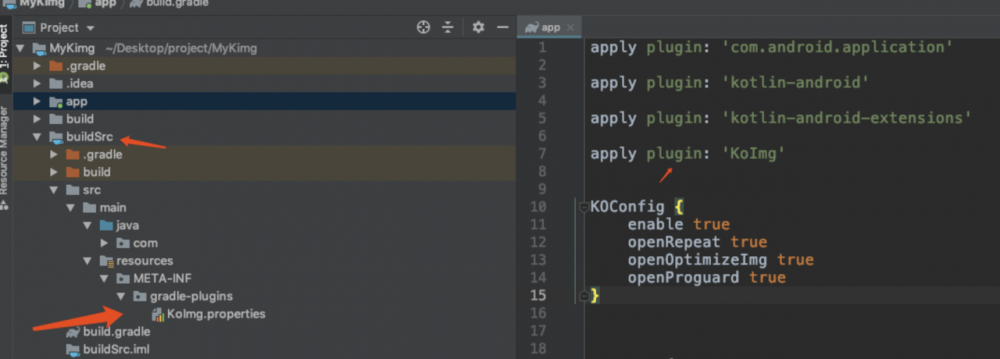
项目创建路径
buildSrc/src/main/resources/META-INF/gradle-plugins/KoImg.properties(记住KoImg.properties的文件昵称,因为在子项目使用的的apply plugin: 'XXX',用的就是这个文件的昵称) 文件里面的内容写implementation-class=com.qihoo.koimg.KoImgPlugin,第 2 步骤创建类的全路径名。 -
直接在应用项目的
build.gradle加入apply plugin: 'KoImg'即可。
好啦,随便运行下,就能在 Build 控制台中看到。

总结
这章节只负责教大家搭建一个简单的 Plugin 工程,以及 Apk 是如何编译的,下一篇正式讲解资源优化。
正文到此结束
热门推荐


相关文章

近期评论
-
https://www.newcmy.com/register?aff=HBVX
建议您试试草莓云机场,可以流畅观看youtube和tiktok,上reddit/x也没有问题,还有各种ai优化节点。 -
出现OpenClaw "device signature expired"。the Gateway rejects if Math.abs(Date.now() - signedAt) > 10 * 60 * 1000 (10 minutes)
-
-
想购买您这个站,我的联系方式QQ741756694微信同步 能卖联系
-
-
-
-
-
https://www.liuhaihua.cn/archives/40657.html 这篇博客中的图片打不开了
-
不会英语啊。
Loading...
![[HBLOG]公众号](https://www.liuhaihua.cn/img/qrcode_gzh.jpg)

