【每日一博】Netty5 Read 事件处理过程
原 荐 顶 Netty5 Read事件处理过程_源码讲解
发表于5天前(2015-05-28 18:37) 阅读( 677 ) | 评论( 0 ) 0 人收藏此文章,
赞 1
大约十一点零八发,秒杀云主机赢P8手机
摘要
Netty是对Nio的封装,解决了很多Nio的一些bug(后期我也会写几个关于Java的NIo bug的文章)。Netty对连接的创建、read事件发生时的二进制数据的接收、缓冲以及解码还有 write事件时,二进制数据的缓冲以及内存分配都给出了不错的解决方案。本博文不是用来介绍Netty的怎么用的。而是从源代码级别讲解一下Netty的实现(连接建立、read、write事件的处理)。 这一篇讲的就是Netty的 Read事件处理的过程。Netty read事件处理流程代码讲解。后面也有流程图哦!!! 欢迎大家吐槽。不吝赐教!!
netty5 源代码 read 读 事件处理
目录[-]
netty是对Nio的一个封装,关于网络的所有操作都是通过事件的方式完成的。例如连接创建、read事件、write事件都是通过Nio来完成 的。那netty是怎么启动监听的呢? 在什么地方启动的呢?此处不为大家设置悬念,一次性告诉大家。通过循环扫描的方式来实现监听的。具体的方法类位于NioEventLoop的run方法中 (赶紧进去看看吧!! 浅显易懂)。
下面是netty的acceptor线程创建连接的代码。位于类NioEventLoop的processSelectedKey中(至于 processSelectedKey是怎么被调用的,自己看看调用链就行了(eclipse用ctrl+Shift+H就可以查看到选中方法的调用 链))。
private static void processSelectedKey(SelectionKey k, AbstractNioChannel ch) { final NioUnsafe unsafe = ch.unsafe(); if (!k.isValid()) { // close the channel if the key is not valid anymore unsafe.close(unsafe.voidPromise()); return; } try { //得到当前的key关注的事件 int readyOps = k.readyOps(); // Also check for readOps of 0 to workaround possible JDK bug which may otherwise lead // to a spin loop //一个刚刚创建的NioServersocketChannel感兴趣的事件是0。 if ((readyOps & (SelectionKey.OP_READ | SelectionKey.OP_ACCEPT)) != 0 || readyOps == 0) {//可以读取操作 --对于serverSocket来说就是acceptor事件、对于socketChannel来说就是read事件 //INFO: channel类型为io.netty.channel.socket.nio.NioSocketChannel unsafe类型为io.netty.channel.nio.AbstractNioByteChannel$NioByteUnsafe Object obj = k.attachment();//得到NioServerSocketChannel或者NioSocketChannel if(obj instanceof NioServerSocketChannel){ System.out.println(obj.getClass().getName()+ " 开始接收连接"); }else{ System.out.println(obj.getClass().getName()+ " 开始接收字节"); } //不同的socketChannel对于那个的unsafe是不同的。例如Server端的是messageUnsafe 而 clinet端是byteUnsafe unsafe.read();//对于接受链接或者read兴趣都会添加进入read操作调用serverSocket->NioMessageUnsafe if (!ch.isOpen()) { // Connection already closed - no need to handle write. return; } } if ((readyOps & SelectionKey.OP_WRITE) != 0) {//对于半包消息进行输出操作 // Call forceFlush which will also take care of clear the OP_WRITE once there is nothing left to write ch.unsafe().forceFlush(); } if ((readyOps & SelectionKey.OP_CONNECT) != 0) { // remove OP_CONNECT as otherwise Selector.select(..) will always return without blocking // See https://github.com/netty/netty/issues/924 int ops = k.interestOps(); ops &= ~SelectionKey.OP_CONNECT; k.interestOps(ops); unsafe.finishConnect(); } } catch (CancelledKeyException e) { unsafe.close(unsafe.voidPromise()); } } 这里我们以Read事件的处理(NioByteUnsafe)为线索进行讲解。后续会有基于byte的unsafe进行讲解的(Unsafe不知道为啥要这 么叫,本人也感到挺费解的,不过现在看来感觉就是一个工具对象。不要从名称上惧怕它)。下面来看NioByteUnsafe(该类是AbstractNioByteChannel的一个内部类)的read方法进行讲 解。直接讲代码(后面也会有图形讲解,方便大家理解):
public void read() { //得到config对象、pipeline对象 final ChannelConfig config = config(); //得到对应的管道对象 final ChannelPipeline pipeline = pipeline(); //实际的内存分配器--- final ByteBufAllocator allocator = config.getAllocator(); final int maxMessagesPerRead = config.getMaxMessagesPerRead(); RecvByteBufAllocator.Handle allocHandle = this.allocHandle; if (allocHandle == null) { //创建一个allocHandle对象--AdaptiveRecvByteBufAllocator //RecvByteBufAllocator负责内存分配的算法问题 this.allocHandle = allocHandle = config.getRecvByteBufAllocator().newHandle(); } if (!config.isAutoRead()) { removeReadOp(); } ByteBuf byteBuf = null; int messages = 0; boolean close = false; try { int byteBufCapacity = allocHandle.guess(); int totalReadAmount = 0; do { //可能是 direct或者 heap 从与当前socket相关的allocator得到byteBuf数组 // byteBuf =allocHandle.allocate(allocator); //每次从内核中读取数据netty都会分配内存 byteBuf = allocator.ioBuffer(byteBufCapacity); //获得可以写入的容量的大小 int writable = byteBuf.writableBytes(); //分一个多大的内存就从socket中读取多大的数据 int localReadAmount = doReadBytes(byteBuf);//从socket中读取数据到bytebuf中 if (localReadAmount <= 0) {//发生了读取事件,但是读取的长度是负数, // not was read release the buffer byteBuf.release();//释放到Thread Cache中 close = localReadAmount < 0;//是否进行关闭,关键要看读取到的数据的长度是否为-1; break; } //发起读取事件---如果是第一次积累数据的话,那么就会将当前的bytebuf作为累积对象,供继续使用 pipeline.fireChannelRead(byteBuf); byteBuf = null;//由pipeline进行byteBuf的释放 //避免内存溢出, if (totalReadAmount >= Integer.MAX_VALUE - localReadAmount) { // Avoid overflow. totalReadAmount = Integer.MAX_VALUE; break; } totalReadAmount += localReadAmount; if (localReadAmount < writable) { // Read less than what the buffer can hold, // which might mean we drained the recv buffer completely. break; } } while (++ messages < maxMessagesPerRead);//每次读取的消息的数量都会有限制的,也就说,每次处理read事件的消息量是可以配置的 //读取完成---处理完一次 读取事件 pipeline.fireChannelReadComplete(); //对本次读取的数据量进行记录,便于下一次为当前的Channel分配合适大小的buffer allocHandle.record(totalReadAmount); if (close) { closeOnRead(pipeline); close = false; } } catch (Throwable t) { handleReadException(pipeline, byteBuf, t, close); } } } //上述代码段说明: /** config.getRecvByteBufAllocator().newHandle(); 负责内存分配算法 而 ByteBufAllocator 负责具体的内存分配-分配到堆还是直接内存 */
这就是对一个read的处理基本流程,就是将从socket中读取到的放入到分配器分配的bytebuf,然后将其传入到pipeline.fireChannelRead(byteBuf);中,至于在pipeline是怎样的传递的,我们从这个方法中是无法查看到的。这也是我们这篇文章的主要内容(别的内存也很重要哦!关键是我已经添加了很多注释了!)。就是要看看在得到bytebuf后,pipeline是怎么处理传入进去的bytebuf的。我们来对pipeline.fireChannelRead(byteBuf);穷追(ctrl+shift+H eclipse)到具体的实现,
我们发现,最终会调用到的ChannelHandler接口的
void channelRead(ChannelHandlerContext ctx, Object msg) throws Exception;
ChannelHandler有很多我们具体选用哪一个呢?动动脑子就知道,我们pipeline中存储的都是ChannelHandler,有哪些个Handler,就要看我们在启动代码中是怎样设置了。来看看我的启动代码(精简版,没有写全,所以这里看不懂得话,建议你写个Netty的小demo).上代码:
ServerBootstrap b = new ServerBootstrap(); b.group(bossGroup, workerGroup) .channel(NioServerSocketChannel.class) // .option(ChannelOption.ALLOCATOR, )//设置内存分配器 .option(ChannelOption.SO_SNDBUF, 1024)//发送缓冲器 .option(ChannelOption.SO_RCVBUF, 1024) .option(ChannelOption.RCVBUF_ALLOCATOR, AdaptiveRecvByteBufAllocator.DEFAULT)//接收缓冲器 .handler(new LoggingHandler(LogLevel.INFO))//serverSocketChannel对应的ChannelPipeline的handler .childHandler(new ChannelInitializer<SocketChannel>() {//客户端新接入的连接socketChannel对应的ChannelPipeline的Handler @Override public void initChannel(SocketChannel ch) { SocketChannelConfig config=ch.config(); ChannelPipeline p = ch.pipeline(); p .addLast(new LineBasedFrameDecoder(30))//也会将回车符删除掉--是以换行符作为分隔的 .addLast(new DiscardServerHandler()); } }); 由此可以看到,这里第一个被调用的ChannelHandler是LineBasedFrameDecoder。看看LineBasedFrameDecoder是怎么实现ChannelRead方法的。翻看了弗雷之后,我们终于找到了channelRead方法。由此可以看到,在AbstractNioByteChannel的read方法中的pipeline.fireChannelRead(byteBuf);按照我的启动代码(虽然说是按照我的,但是按照你们的也是这样,因为byte在通过网络接收之后,都要进行decode,第一个经过的channelHandler肯定是ByteToMessageDecoder,不信,你看看自己的启动代码试试),最终调用的是ByteToMessageDecoder.channelRead() ,上代码:
public void channelRead(ChannelHandlerContext ctx, Object msg) throws Exception { if (msg instanceof ByteBuf) { RecyclableArrayList out = RecyclableArrayList.newInstance(); try { ByteBuf data = (ByteBuf) msg; first = cumulation == null; if (first) { cumulation = data; } else { //缓冲区的大小没有超过需要写入的数据的大小 if (cumulation.writerIndex() > cumulation.maxCapacity() - data.readableBytes()) { expandCumulation(ctx, data.readableBytes());//扩展缓冲区--查看实现后,就是通过分配一个更大的,然后复制一下字节数据 } cumulation.writeBytes(data);//将数据写入到积累对象中 data.release();//释放bytebuffer(heap或者direct)--通过引用的方式进行释放缓冲区(至于什么是引用方式释放,我们会有一个特定的章节进行讲解) } //收集完毕之后解析收集到的字符串---通常调用子类的方法实现,在具体实现中,用out来承载解析出来的msg callDecode(ctx, cumulation, out);//实现的时候,不要释放我们的累积对象cumulation } catch (DecoderException e) { throw e; } catch (Throwable t) { throw new DecoderException(t); } finally { if (cumulation != null && !cumulation.isReadable()) {//如果累积对象为null或者没有可读内容的话,那么就将累积对象释放掉(因为空了或者为null了) cumulation.release(); cumulation = null; } int size = out.size();//代码 11 decodeWasNull = size == 0; //针对解析后的out结果中的msg的对象,将解析出来的message(具体的类型,请自己看实现.是怎样做的)传递到pipeline中。 for (int i = 0; i < size; i ++) { ctx.fireChannelRead(out.get(i)); } out.recycle();//代码 22 } } else { ctx.fireChannelRead(msg); } } 提示: 一个pipeline,为某个socketChannel所有,也就是说pipeline里的channelHandler,也是为某个socketchannel所享用的。不会出现多个线程共享一个channelHanler的情况(我们可以让他们共享一个handler,但是我们得保证这个共享的handler是一个无状态的handler,例如我们现在就要讲解的ByteToMessageDecoder就是一个有状态的handler,所以就不能共享,就要在每次初始化socketChannel的pipeline时,都要重新new一个ByteToMessageDecoder,不信大家,可以可以看一下ByteToMessageDecoder的实现。我直接粘贴代码吧!!(看看我的注释哦)如下:).
public abstract class ByteToMessageDecoder extends ChannelHandlerAdapter { ByteBuf cumulation;//因为单词cumulation --累积 意思,也就是,这个成员对象,就是用来作为半包的累积存储的对象来使用的 private boolean singleDecode; private boolean decodeWasNull; private boolean first; } 下面我们看一下callDecode()是怎样完成的,上代码,
protected void callDecode(ChannelHandlerContext ctx, ByteBuf in, List<Object> out) { try { while (in.isReadable()) {//传入的字节是否有可读数据 int outSize = out.size(); int oldInputLength = in.readableBytes(); decode(ctx, in, out); // Check if this handler was removed before continuing the loop. // If it was removed, it is not safe to continue to operate on the buffer. // // See https://github.com/netty/netty/issues/1664 if (ctx.isRemoved()) {//如果此handler被移除 break; } if (outSize == out.size()) { if (oldInputLength == in.readableBytes()) { break; } else { continue; } } if (oldInputLength == in.readableBytes()) { throw new DecoderException( StringUtil.simpleClassName(getClass()) + ".decode() did not read anything but decoded a message."); } if (isSingleDecode()) { break; } } } catch (DecoderException e) { throw e; } catch (Throwable cause) { throw new DecoderException(cause); } } 上面的代码,很容易易理解,就是进行必要的校验,其中最惹人眼的就是decode()方法,而decode方法该类中是抽象方法:
/** * Decode the from one {@link ByteBuf} to an other. This method will be called till either the input * {@link ByteBuf} has nothing to read anymore, till nothing was read from the input {@link ByteBuf} or till * this method returns {@code null}. * * @param ctx the {@link ChannelHandlerContext} which this {@link ByteToMessageDecoder} belongs to * @param in the {@link ByteBuf} from which to read data * @param out the {@link List} to which decoded messages should be added * @throws Exception is thrown if an error accour */ protected abstract void decode(ChannelHandlerContext ctx, ByteBuf in, List<Object> out) throws Exception; 我们来看一下具体实现有哪些?见下图
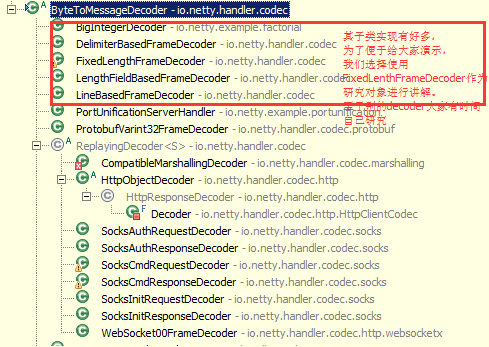
我们发现ByteToMessageDecoder的的decode子类实现有好多,我们为了讲解的方便我们选择使用,FixedLengthFrameDecoder作为研究对象。至于别的decoder大家有时间自己去看一下吧1!!(很简单的,不要害怕).
上代码(FixedLengthFrameDecoder.decode方法):
protected final void decode(ChannelHandlerContext ctx, ByteBuf in, List<Object> out) throws Exception { Object decoded = decode(ctx, in); if (decoded != null) { out.add(decoded);//out是外界传入的一个用来盛放解析出来的message对象的容器 } } 此处调用了自有的decode方法,上代码:

这里我们看到如果可以读取的数据长度没有要求的长度搞的话,那么就会以传入的ByteBuf参数(其实这里就是那个累积对象)为基础,构建一个新的ByteBuf。
下面我们这里特意大概翻译下in.readBytes(frameLength)方法的注释是怎样的情况.
ByteBuf io.netty.buffer. ByteBuf .readBytes(int length)
Transfers this buffer's data to a newly created buffer starting at the current readerIndex and increases the readerIndex by the number of the transferred bytes (= length ). The returned buffer's readerIndex and writerIndex are 0 and length respectively.
-
Returns:
-
the newly created buffer which contains the transferred bytes 该方法返回的是新创建的盛有传输数据的直接缓冲对象
将当前的ByteBuf对象的数据传输到一个刚刚创建的ByteBuf,就是从readerindex开始,然后增加ReaderIndex的值,增加length个字节数。返回的字节的的readerindex和writerindex分别是0和length。
通过阅读上面的注释的阅读,我们可以看到,就FixedLengthFrameDecoder解析器来说,其实累积对象对readerIndex进行了改变。也就是说,累积对象可以读取的数据的数据量是发生变化的(我们可以在源代码中看一下在decode前后,readerindex是否发生了变化,观察一下就知道了。这个很简单哦,看一下我是怎么知道这一点的,见下图)。至于除了FixedLengthFrameDecoder之外的别的decoder是否也改变了readerindex,大家可以去具体查看一下代码(不过我个人觉得肯定都是这么做滴!!)。

----------------------------------------------------------------------------------------------------------
累积对象的内存释放问题讲解完了(其实很简单,就是把readerindex改变了一下,具体长度就看解析出来的message的长度了,哈哈)。
讲到这里,会涉及到一个解析出来的message在被pipeline中的其它handler处理完毕后的内存释放问题。怎么解决? 什么时候释放这些message占用的空间呢?
我们从上面代码11 和代码22之间的代码可以看出,就是在将子类解析出来的msg,传入到后续的( 因为当前的decoder Handler负责将大的ByteBuf累积对象转换成小的后续handler可以理解的msg对象,数据这个msg对象是个什么类型,就要看子类是怎么将什么类型的msg放入到out盛放容器的了 )handler中。由此可以看出: 对于一个socketChannel,其message的处理顺序不会出现错乱。永远都是先处理完前一个,然后才是后一个,因为这是在一个线程里依次处理所有的msg的。
message是在什么时候释放呢? 还是看 代码11 和代码22之间的代码 大家可以自己去看看代码。我发现就是被丢了,被JVM回收了,没有重复利用。我个人觉得可以重复利用。关于这个问题,大家回去自己理解一下吧!!有时间得的话,我也会专门将一下的。毕竟这篇文章是讲Netty read事件处理的。 不是将netty内存分配的。放心我不会忘记这个问题的。我会在后续的文章中讲解的。欢迎大家吐槽!!!
本文是本人学习Netty后的个人总结的分享,需要说明的是本人仅仅代表个人的看法,不是什么官方权威的版本,如果有不当之处,还请赐教!!欢迎吐槽!!
分享到: ![]()
![]() 1 赞
1 赞
声明:OSCHINA 博客文章版权属于作者,受法律保护。未经作者同意不得转载。
正文到此结束
热门推荐


相关文章


Loading...
![[HBLOG]公众号](http://www.liuhaihua.cn/img/qrcode_gzh.jpg)

